Sunday, 30 September 2012

Butterscotch Sauce


Oh baby... look at that action shot!

Ice cream is special. We all love it just the way it is, but sometimes, it deserves a little special treatment. Some pampering. Take your ice cream to the Sauce Spa. Let it bathe in butterscotch. This recipe for silky smooth butterscotch sauce is very quick to whip up, and can keep in a jar in your fridge for a few weeks!

Remember when I made Peach Shortcake? Yeah, this was the sidekick. I also used this when I served up a certain Peach and Berry Cobbler Cake. Dress up your dessert!

Butterscotch Sauce
Recipe from David Lebovitz

  • 1/4 cup butter
  • 1 cup brown sugar
  • 1/4 cup + 6 tbsp heavy cream
  • 1/2 tsp vanilla
In a small saucepan, melt the butter and the brown sugar with 1/4 cup of the heavy cream, stirring until smooth.
Without stirring, let the mixture bubble and boil for about 3 minutes.
Turn off the heat and add the remaining 6 tbsp heavy cream. let it cool for a minute, then stir in the vanilla.


VOILA!

Your ice cream will thank you.
<3 Lari


Wednesday, 26 September 2012

You've Been on My Mind...

I have so many recipes floating around in my head that I have been wanting to make so badly lately ALL THE TIME.

Sometimes there are just so many that I feel overwhelmed. But I think that feeling overwhelmed about delicious recipes/food is probably the best type of overwhelmed  you can feel. For me at least. Perhaps letting a few of these ideas escape from my scattered brain and make an appearance out here will make me feel better. And hopefully soon I can make them!
If I ever get my homework done... BUT MORE IMPORTANTLY:


1) Lately I have been intrigued by cookies with icing/glazes, and these Applesauce Oatmeal Cookies from Martha with a maple glaze look like the perfect fall cookie


2)ANNA OLSON HAS A NEW BAKE OFF CHALLENGE! And it's my lucky day because the challenge is Pumpkin Muffins. I am in fact on the search for a good pumpkin muffin recipe... maybe this is it!


3) Speaking of Anna, I watched an episode of Bake with Anna Olson in which she made Zucchini Orange Loaf. My mother especially loves zucchini loaf (as do I!). I am thinking I will make one just for her.


4)We have some millet kicking around in our pantry, and I saw it the other day. I thought, I must find a recipe to use this in. As if by magic, I discovered this cracker recipe from "A Sweet Spoonful". I am totally making these and cutting them into funky shapes. Leaves for fall, maybe?


5) We are in need of more granola in the household. I am so trying out this Pumpkin Granola Recipe


I hope I can keep fitting baking into my routine even though school is busy as heck. It is important to me!
Happy Fall Cooking/Baking!
<3 Lari

Sunday, 23 September 2012

This Week Was: Packed.

WOAH. A lot happened this week. Kinda stressed, but whateva. Life is full, and full of fun right now.
September 17-23 2012

MONDAY
Rockin' out at Edward Sharpe and the Magnetic Zeros
 
TUESDAY
Dining solo, mexican fiesta style. I <3 Fried Eggs

WEDNESDAY
Happy Birthday to my Big Bro!


THURSDAY
Oops... totally didn't go to Vendome on Thursday... but I have to post this picture... cuz guys, it's Vendome. Coffee and a Chocolate Chip Cookie


FRIDAY
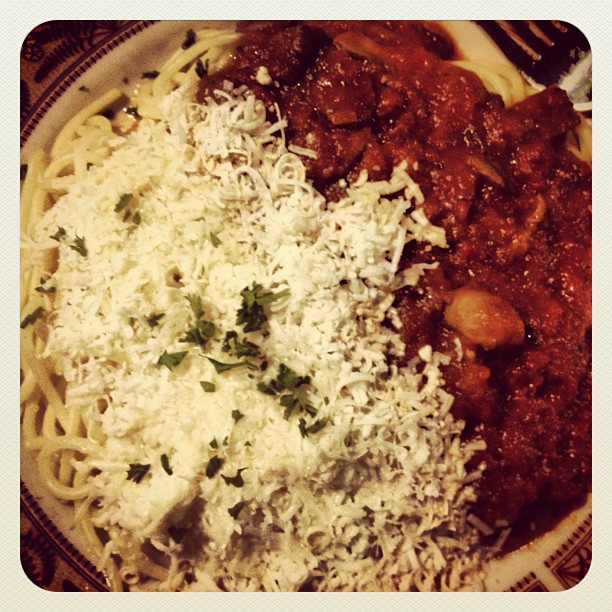
Carb-loading pre-race day at The Old Spaghetti Factory. I don't care if it's a cheap restaurant, I love it. Also, Mizithra cheese  is delicious.
SATURDAY
Impromptu Dinner Dates with my one and only love! More pasta too... always welcome. (@ Chiante's)
SUNDAY
Some light sunday morning reading. And a coffee. Life is good.

Here's to next week, and hoping it is a little more gentle! But still packed with goodness.
Have a good week!

<3 Lari

Vanilla Marshmallows

Many people in the food blogging world have been blogging about homemade marshmallows. I am so totally going to jump onto this bandwagon. What you need to know:
  • they are so much better than store bought!
  • they take s'mores and hot chocolates to the nest level... yes it is possible
  • make them, and people will think your some kind of magician.

Hello, new best friends...
GUYS! I am seriously in love with homemade marshmallows! First time I heard about this book, I knew I HAD TO HAVE IT. It was one of those books that I was just dying to get, and for some reason I could not bring myself to make homemade marshmallows until I had that book in my hands to call my own. So, with the arrival of my first full time summer job, I made the decision to celebrate my first paycheck by purchasing two cookbooks. One of which was Marshmallow Madness. What a magical day that was when I saw that the package had arrived in the mail. Getting packages is probably one of the most thrilling things in life. Also thrilling: toting your fresh homemade marshmallows in beautiful vintage tins to share with your friends. I'm making it my new "thing".
I won't lie, these were rather difficult for me to make. Don't get me wrong, the recipe is very clear and the instructions are super helpful... But I'm a baker at heart. Give me muffins, cakes and cookie recipes and I am at home. But this chucked me straight into the mystery land of candy-making. I want to become a better candy-maker, so one day it is not so scary. Before then, bubbling sugar and I have some "getting to know you" work to do. I made these marshmallows twice. The first time was a hot, solidified-sugary mess that left my kitchen in ruins. But, if you fall off the horse you gotta get right back on... or something like that. So I hopped back on the marshmallow horse (does this make any sense) and tried, tried again. And succeeded! And it was OH so worth it.
I could continue to ramble... but basically, do not be afraid! Try it out, be amazed. Some advice: I find it much less stressful to make marshmallows when:

  • my kitchen is clean (because you are going to soon turn it into a serious mess)
  • I have pre-measured all of my ingredients and set them out, ready to rock
  • it is not ridiculously late in the evening... although this seems to be the only time I have to make them.

Pillows of sugary love!! THEY'RE SO SQUISHY


Here are just a couple examples of methods to enjoy: in hot chocolate, or roasted for s'mores... DIVINE!

Homemade Vanilla Marshmallows
Recipe originally from this book

  • 4 1/2 tsp unflavoured powdered gelatin (I used Knox brand)
  • 1/2 cup cold water
  • 3/4 cup sugar
  • 1/2 cup corn syrup, divided
  • 1/4 cup water
  • 1/8 tsp salt
  • 2 tsp vanilla
  • 1/2 cup Classic Coating*
*Recipe for Classic Coating follows below marshmallows*

Lightly coat an 8X8 inch pan with cooking spray.

In a small, microwave-safe bowl, stir together the gelatine and cold water and let soften for 5 minutes

In a medium saucepan, stir together the sugar, 1/4 cup of the corn syrup, water and salt. Boil over high heat, stirring occasionally until the syrup reaches 240F. MEANWHILE: pour the remaining 1/4 cup corn syrup into the bowl of a standing mixer fitted with the whisk attachment. Microwave the gelatin until completely melted, about 20 to 30 seconds. Pour it into the mixer with the corn syrup and set the mixer to low speed. Just keep mixing this until your syrup is ready to rock. (aka when your syrup has reached 240F)

Once your syrup has reached 240F (no hotter!) slowly pour it into the running mixer, pouring the hot syrup down the side of the bowl so that it does not splash and burn you. Ouch. 
Increase your mixer speed to medium and beat for 5 minutes.
Increase the speed to medium high and beat for 5 more minutes.
Finally, beat on the highest setting for 1-2 minutes more. Slow the speed a bit to add in the vanilla. The marshmallow batter should be opaque, white and super fluffy, and about tripled in  volume. 

Pour into the prepared pan and use an offset spatula to smooth it into the corners of the pan. Sift the coating evenly and generously over the top. Leave your marshmallows to set in a cool and dry place for at least 6 hours.

Once the mallows have set, use a knife to loosen them from the edges of the pan. Plop out your marshmallow onto a coating dusted cutting board or work surface and dust with more coating.
Cut into desired shapes and dust exposed edges with coating.

TADAA! You totally just made homemade marshmallows. Be proud.

*Classic Coating Recipe:
  • 1 1/2 cups powdered sugar
  • 1 cup corn starch
Sift the two ingredients together. This coating keeps forever in an air-tight container in your cupboard. Keep it for all your marshmallow making needs.

Happy Marshmallow Making!

<3 Larissa


Graham Wafer Cookies

Adventures in Gourmet S'mores!
S'mores are great no matter how ya make them. But... if a little extra time and effort it put in... you can make them BEYOND AMAZING... and then you just can't return to those regular store-bought stale marshmallows and crumbly dry graham wafers again.

Here I bring you homemade graham wafer cookies! This recipe is from here, but I want to try it from here next time and do some comparing. On the search for perfection. These are darn close.
Graham Wafer Cookies
Recipe from Marshmallow Madness
Notes: These don't particularly taste like the store-bought graham wafers you're used to... but they are a delicious cookie that pairs excellently with chocolate and marshmallows! They have a nice little hint of cinnamon which I loved.
  • 2 cups flour
  • 1/2 cup whole wheat flour
  • 1/2 cup brown sugar
  • 1 tsp salt
  • 1/2 tsp ground cinnamon
  • 1 cup butter cut into pieces
  • 1/4 cup honey
In a food processor, blend together the flours, sugar, salt and cinnamon. the the butter pieces and honey and blend until mixture comes together.
I found my dough to be VERY crumbly... but in the end it all turned out to be okay. So no worries.
Wrap dough in plastic wrap and refrigerate for about one hour. I kept mine in the fridge for too long, and found that I had to kind of work the dough to get it to soften out afterwards. So, in hindsight, to make less work, I would not let it keep in the fridge for much over an hour.
Line baking sheets with parchment or silpats. turn out the cookie dough onto a lightly floured surface and roll to 1/8 inch thick.
Cut out your cookies into rectangles, or whatever shapes you want. You can even use cookie cutters!
Place your cookies on the prepared trays and prick with a fork. I played around with some funky designs. Now you need to chill your cookies back in the fridge for about 15 minutes before baking. Time to preheat the oven to 350 (or 325 for hot ovens).
Bake cookies for 14-16 minutes until lightly golden. Let cool on pans for a bit, then transfer to a wire rack to cool completely.

OPTION!
Get your graham wafers prepped for some serious s'more making! When they are still warm from the oven, take your favourite good quality chocolate bar (I used this one, to use for salted caramel s'mores!)and break it into small pieces. Place/gently rub the chocolate over the warm cookie to melt and adhere the chocolate to the surface. Now all you need is a toasty marshmallow, and Gourmet S'mores are so totally possible!

<3 Lari


Sunday, 16 September 2012

It's Autumn and I'm Diggin' It


A week of Instagrams:
September 10-16, 2012
MONDAY
Okay so this was actually snapped on Sunday night... but it was really late! So I am totally counting it as Monday. My blog, my rules, yo. My aunt and I made Salted Caramel S'mores: Homemade Graham Wafer Cookies spread with Lindt Dark Chocolate Sea Salt bar, topped with homemade Salted Caramel Marshmallows...
WOAH. That was a good idea.
TUESDAY
IT'S OFFICIALLY AUTUMN! Because I had my first Pumpkin Spice Latte of the Season. MAN I am smitten.
WEDNESDAY
Just an average note taking day at ACAD, with doodles of breakfast foods and free popcorn. School need not be boring.
THURSDAY
Another example of school not being boring, and a glimpse of my first Fibre project!! I'm pretty excited.
FRIDAY
What happened in my kitchen on Friday night. I am feeling the Fall, guys. Pumpkin Cream Cheese Spread and Apple Chips. Both recipes originally found from A Beautiful Mess, best blog out there!

SATURDAY
Breakfast:
Hazelnut Coffee,
Pear with greek yogurt and granola,
Half a toasted english muffin with the Pumpkin Spread I made the night before.
Awesome.
Also, my mug has a sweater. I know, right?


SUNDAY
A painting extravaganza night... for a project due tomorrow morning! I think it's done...?

Hope you are loving this time of year as much as I am!
<3 Lari

Saturday, 15 September 2012

Pumpkin Chocolate Chip Muffins

IT'S AUTUMN AND I'M STOKED
GUYS. It's Autumn! I'm embracing it. Yes, I will miss summer and all it's wonderful fresh fruit, but Autumn is probably my favourite time of year. (or at least the beginning when the leaves are pretty... when it gets too brown, not so much.)
I love this time of year because of:
  • PUMPKIN SPICE EVERYTHING (especially lattes)
  • big comfy sweaters
  • colours like maroon, burnt orange, mustard yellow
  • tights and socks
  • lots of layers and scarves
  • everything is just so darn beautiful
  • apples, pumpkins and other squashes, cinnamon, warm beverages, pies, pears, plums etc etc etc.
Life just feels cozier.


You know what else feels cozy? Pumpkin muffins.
Make it even more cozier by adding (many) chocolate chips. Thank you Autumn, you rock.


Some notes on these: I am on the search for my favourite pumpkin muffin recipe, as I have not made them very many times at all. I tried this recipe, and they are good... but I don't know if they are the winning batch just yet. I will be trying more recipes until I find THE ONE! It's a tough job, but somebody must do it :)

Pumpkin Chocolate Chip Muffins
Recipe Adapted from here
(I halved the original recipe, and ended up with 11 muffins)
Here's what I did:
  • 1/2 all purpose flour
  • 1/2 cup whole wheat flour
  • 1/2 tsp baking soda
  • 1/4 tsp salt
  • 1/2 tsp cinnamon
  • 1/4 tsp ground ginger
  • 1/8 tsp ground cloves
  • 1/8 tsp ground nutmeg
  • 1/4 cup plus 2 tbsp brown sugar
  • 1 1/2 tbsp molasses
  • 2 tbsp canola oil
  • 1 egg
  • 1/2 cup pumpkin puree
  • 1/2 tsp vanilla
  • 1/4 cup plus 2 tbsp buttermilk*
  • 1/4 to 1/2 cup chocolate chips (I started with 1/4cup, which probably would have been fine but my chocoholic self peer pressured me to put more in...)
*Don't have buttermilk on hand? Me neither. So I make it! It is super easy: For every cup of regular milk, add about 1 tbsp lemon juice or white vinegar. Stir, and let sit for a minute or so. The milk will look gross! But this is normal. Use this ratio for any other recipes that require buttermilk.

In a bowl, whisk together the two flours, baking soda, salt, and spices.
In the bowl of a mixer, combine the brown sugar, molasses, oil and egg. Next mix in the pumpkin, then the vanilla. Stir in the flour mixture in two additions, alternating with the buttermilk. Stir in the chocolate chips.
Divide the batter into paper lined muffin tins and bake at 400 (375 for hot ovens) for about 18 to 20 minutes until a toothpick inserted comes out clean.
Let cool a bit...
Then enjoy one of the best moments about this awesome season!

Great for a snack on the road, or with a warm mug of coffee.

Happy Pumpkining!
(I hope to bring many a pumpkin recipe to the table this year)
<3 Lari

Sunday, 9 September 2012

My Week with Instagram


This week was very much back to school. WOW I actually have to do homework again! AHH But still very much fun times... especially when a certain Aunt gives you a surprise visit from Toronto!! We had a lot of fun together this week, I'm sad that she has to go home tomorrow.

MONDAY: planning for the future...

TUESDAY: tired feet after a long day

WEDNESDAY a *free!*pork taco from the Los Compadres food truck, courtesy of ACAD

THURSDAY OH MY GOD IT HAS ARRIVED MY MIXER I LOVE IT SO MUCH AND IT IS PERFECT

FRIDAY man, I love sushi

SATURDAY I am so proud of my big bro! He is such a rock star. Million Dollar Fix released their first CD last night, and threw a wicked party to kick it off! <3 so proud
SUNDAY Borrowing this cookbook from my Aunt... it is now on my wish list! Such a sweet book.
Hope you had a lovely week too!

<3 Lari

Saturday, 8 September 2012

Chocolate Ginger Cookies

Gingerbread: a classic flavour during Christmas time, no? Gingerbread and Christmas just go together like two peas in a pod. One is not the same without the other.
However... sometimes... things are just too good to only be eaten once a year. These cookies fall into that category. Hence why I made them a few weeks ago!
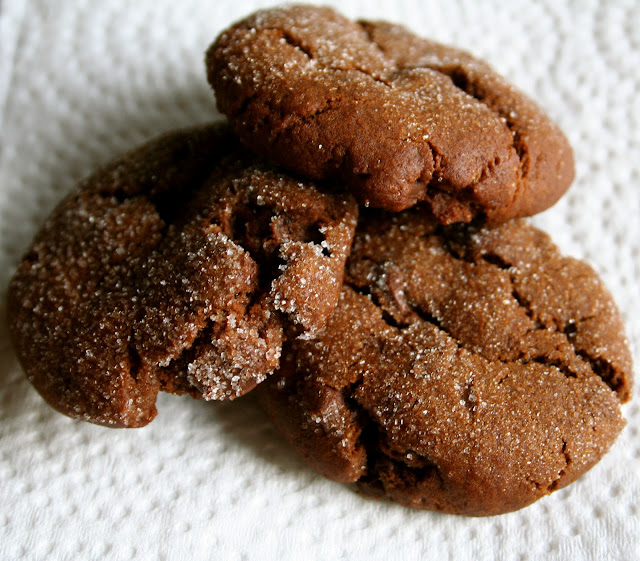
Enter the chocolatey-goodness of Chocolate Ginger Cookies! This is one of my favourite recipes. They have an amazing ginger flavour thanks to fresh and ground ginger, and the chocolate flavour from cocoa powder along with chunks of chocolate throughout makes them so much better than an average ginger snap. Because let's get real, chocolate chunks make everything better, am I right?
Perfect when paired with a hot chocolate by the fire on a cold winter's eve... Or anytime during the year when you just want really delicious cookies. Add a glass of cold milk into the mix, and you're golden.

Chocolate Ginger Cookies
Recipe from my friend Martha

  • 1 1/2 cups plus 1 tbsp flour
  • 1 1/4 tsp ground ginger
  • 1 tsp ground cinnamon
  • 1/4 tsp ground cloves
  • 1/4 tsp ground nutmeg
  • 1 tbsp cocoa powder
  • 1/2 cup butter
  • 1 tbsp freshly grated ginger (peeled!)
  • 1/2 brown sugar (light or dark is fine, I used dark)
  • 1/2 cup molasses
  • 1 tsp baking soda
  • 1 1/2 tsp boiling water
  • 7 ounces semi-sweet chocolate (or bittersweet if you are feeling dark and dangerous) cut into chunks, or you can use about 1 cup of chocolate chips in a pinch!
  • 1/4 cup granulated sugar
In a bowl, sift the flour, spices and cocoa powder. In a mixer, cream together the butter and ginger until fluffy, about 4 minutes. Add sugar, beat it! Add molasses, beat it! Like Michael Jackson.
In a small bowl, dissolve the baking soda with the boiling water. Beat half of the flour into the butter mixture, followed by the baking soda mixture, followed by the remaining flour, beating until just combined after each addition. Stir in the chocolate. shape dough into a disk, wrap in plastic and chill in the fridge until firm, 2 hours or overnight.

Preheat your oven to 325 (300 if you have a crazy hot oven, like moi). Line baking sheets with parchment or Silpats. (Note: Silpats are the best invention ever, and are well worth an investment.)

Roll dough into small balls, about 1 1/2" or however big you desire. Place 2" apart on baking sheets and chill for 20 minutes. Roll them in the granulated sugar, and if you wish, flatten them a tiny bit with the palm of your hand or a fork. They will spread a tiny bit when they bake, but I do like to flatten them a bit myself to help them out. Bake for 8 to 10 minutes, let cool for 5 minutes or so on the pan, then transfer to a wire rack to finish cooling.

Eat one fresh while the chocolate is still melty, and you will experience euphoria.

<3 Larissa


Mocha Fudge Brownie Cake

I have an apology to make: I do not have a good photo of this cake. I am sorry! But it is one of those things where I made it in the morning before school, and when I came back the family was already into it before there was time to snap a photo! Luckily, I have this Instagram for proof. Sometimes things are just too fantastic to stop and take a photo. Live life as it happens, you know? You can choose to keep, or omit the happy birthday message to my Great Auntie Irene; I am sure she wouldn't mind either way.
Let me first say that this is one of the best cakes I have ever eaten or made. I know, that's a big thing to say, but it truly was delish. I have been craving a brownie lately, and this cake is just what the Brownie Doctor ordered! (Man I wish that was a real profession.) It is beautifully dense like a brownie, and the light coffee-flavoured whip cream is a dreamy accompaniment. If you are opposed to coffee flavoured whip cream (get out of town first) then you can flavour the cream however you like! Strained raspberry puree would be good, or even just some vanilla extract and sugar added to the cream would be great.
Mocha Fudge Brownie Cake
Notes: I switched things up only a tiny bit in this one, I toasted my pecans before chopping them and adding them to the batter, and I would highly recommend it. Also, I used dark brown sugar in the Coffee Cream rather than light... for the simple fact that I forgot to write light brown sugar on the shopping list. Still turned out awesome.

For the BROWNIE CAKE:
  • 1 1/4 cups melted butter
  • 3/4 cup cocoa powder
  • 4 eggs
  • 1/4 tsp salt
  • 1 tsp vanilla
  • 2 cups sugar
  • 1 cup flour
  • 1 cup finely chopped toasted pecans
Prepare your pans for cake batter battle! Do this by greasing two 9" pans with butter, and dust them with flour, tapping out the excess. For extra protection and cake-removal-confidence, cut out a circle of parchment paper to line the bottom of your pan with.

Stir together the melted butter and cocoa powder, set aside. Beat eggs in a mixer till foamy, add in salt and vanilla. Add sugar and beat well, add the cooled chocolate mixture and blend. Sift the flour over the batter and fold in. Next fold in the pecan pieces. Pour half the batter into each pan.

Bake at 350 (325 for my oven) for 20 to 25 minutes until a toothpick inserted in the centre comes out clean. Cool cakes in pans for 5 to 10 minutes, then cool out of pans completely before you frost them, *remember to peel off parchment paper if you used it*. At this stage, you can choose to wrap the cakes in plastic wrap and freeze them (up to 4 weeks) until cake day.

DON'T EVEN THINK ABOUT OVER BAKING!
Do you want a moist fudgey brownie like cake? Then yeah, no over baking. It is the worst feeling. And I have totally never experienced that before... ahem..

For the COFFEE CREAM:

  • 1 1/2 cups heavy cream
  • 1/3 cup brown sugar (light or dark)
  • 2 tsp instant coffee powder
Combine all ingredients and stir until sugar and coffee are dissolved. Beat until you have stiff peaks of fluffy, coffee flavoured whip cream!

KITCHEN TIP!! This is a fun little secret that I learned from hours of studying the Food Network. If you want your whip cream to hold it's fragile peaks and swirls for hours, stir in about 1 tsp of skim milk powder in. You can do this at any stage of whipping it, beginning middle or end... and it works like a dream!

CAKE ASSEMBLY!

Spread the Coffee Cream over the top of the bottom cake layer, spreading right to the edges. Place the top cake layer on top, and frost the top and sides, covering the cake completely. Garnish the cake with whatever you like! The original recipe suggests chocolate curls, I used melted chocolate chips to write a happy birthday message. Refrigerate 1 hour or more before serving.

ENJOY! And happy Cake Baking.
<3 Lari